Well, finally getting around to doing an update. Lazy...
MOAB went off well, people had fun, and we've now got Cancon and Leviathan to look forward to.
I'll put up some photos soon...
Also going to a FOW D-day game this weekend. It should be fun.
I'll try and post more often now.
Promise :)
Friday, November 20, 2009
Wednesday, September 9, 2009
MOAB 09 - The Runaway Bride
Well, this is not so much a new post, but a delayed post. It's been a while since I posted anything... anywaya lot of the oxygen has been sucked out of my gaming the last few months, real life keeps getting in the way. However, I'm running a comp at MOAB in less than a month so I've got to scrounge time to get ready for it.
The game is Wargods of Aegyptus.
The scenario is trying to locate a missing person : Helen, princess of Sparta and lately of Troy.
She and her handmaidens were shipwrecked and lost, scattered throughout the land and her husband has arrived at Thebes and is threatening all sorts of mayhem if she is not found.
The full details are at : http://www.crocodilegames.com/newforum/index.php?showtopic=4657
Anyway, it should be fun, spectacular in a sandy sort of way and keep us all off the streets.
And this time it looks like I'll be getting a decent turnout : between 8 and 12 players! Most I've had before is about six.
The only issue is the extra terrain... and for one scenario, the extra Necromancers! Luckily I have enough horde mummies for almost any eventuality.
BWAHAHAHA!
Monday, July 6, 2009
Sledges!


Wargods of Aegyptus is running a 'World Campaign' at the moment, and one of the scenarios calls for cargo sledges (actually wagons, but I think sledges is more appropriate)
So I thought I'd build some... and then given how easy it was, I thought I'd share it.
Materials
5mm balsa for the sled
3mm MDF for bases
Something for the load : I used Hirst Arts blocks but chunks of extruded polystyrene would make a good alternative
Something to pull the sled
Spare charioteers
Matchsticks
Tools
Small drill
Sharp knife
Cut up your bases
Work out what you're going to use for loads and pre-assemble them.


Cut out the sides and crossbars
Sides should not be more than 50mm long and I'd suggest about three times the thickness of your balsa
The crossbars should be about 12mm wide and the width of your load plus twice the thickness of your balsa plus about 20mm.


Take the crossbars and notch them down slightly so that the narrow down about 5mm wider than your load. Try and do this as evenly as possibe so that the narrower ends are identical.
Take a crossbar and push it into the sides a bit so that it indents the balsa where you want the crossbars to go.

Drill out the corners and cut out the slots for the crossbars. It helps to stack them so you can drill both sides at the same time. This keeps your alignment.

Assemble the sides and crossbars


Drill through the crossbars just outside the sides.

Whittle a little peg from a matchstick and put it into the holes you've just drilled. This holds it all together in a pleasing and authentic fashion.

Paint and put on base with whatever you have to pull the load and your charioteer.
A lucky find!
A few weeks ago at work I discovered that they were throwing away large sheets of polystyrene, used as transport packing... about 1200mm square and 70mm thick. Gloriously thick stuff.
So, after asking, I started grabbing it. :)


Now, all I have to do is (a) store it and (b) find a worthy use for it... and keep my eyes open for more.
I've already rebuilt my hot wire cutter and started cutting it up into 600mm squares.
I have visions of Omaha beach bluffs... and point du Hoc.
So, after asking, I started grabbing it. :)


Now, all I have to do is (a) store it and (b) find a worthy use for it... and keep my eyes open for more.
I've already rebuilt my hot wire cutter and started cutting it up into 600mm squares.
I have visions of Omaha beach bluffs... and point du Hoc.
Friday, April 24, 2009


Saturday, April 11, 2009
More Leviathan preparation
Here's another update on the Leviathan preparations.
Been finishing up some jungle pieces for the swamp table.
Here's before painting and covering in dried coffee grounds

And here's After

Here are the boats for mucking around in the swamp


And here are the WIP shots of the Pits of Djau the Ravager!


The Amulets of Power!

Been finishing up some jungle pieces for the swamp table.
Here's before painting and covering in dried coffee grounds

And here's After

Here are the boats for mucking around in the swamp


And here are the WIP shots of the Pits of Djau the Ravager!


The Amulets of Power!

Tuesday, March 31, 2009
Finally... an update
Well, finally scrounging time and energy to do an update.
The marsh is for all practical purposes complete : an old blue sheet, blue cellophane stickey-taped together to form a complete sheet and then crumpled up, and islands.
Still got to make the rest of the boats...
So if you go down to the marsh today...

I've also done trial layouts of two other scenarios I plan to use for the Leviathan competition.
 The Shards of the Sun
 And their terrifying guardian

The tomb complex

The marsh is for
 all practical purposes complete : an old blue sheet, blue cellophane stickey-taped together to form a complete sheet and then crumpled up, and islands.
Still got to make the rest of the boats...
So if you go down to the marsh today...

I've also done trial layouts of two other scenarios I plan to use for the Leviathan competition.
 The Shards of the Sun
 And their terrifying guardian
The tomb complex

Saturday, March 14, 2009
Today!
Today I will, with some help from friends, start making a marsh for the Sebeki to play in.
Also, I hope to work out why I'm having so much trouble with images, and maybe how to make PDF plans accessible.
Also, I hope to work out why I'm having so much trouble with images, and maybe how to make PDF plans accessible.
Friday, March 13, 2009
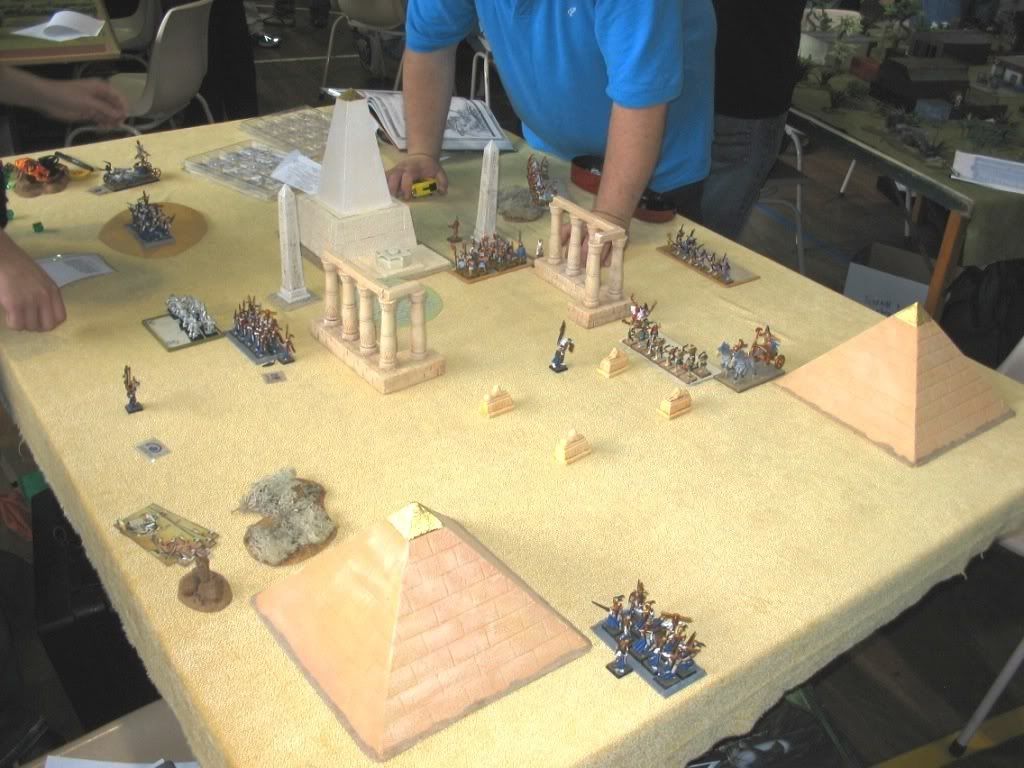
Making things - Pyramids
I play a lot of Wargods of Aegyptus
It's a fun game with excellently sculpted miniatures, a very nice game engine and a fun background based on Egyptian mythology.
Anyway, building terrain is one of my favorite things and what is more egyptian than a pyramid!
HOW TO MAKE A PYRAMID
What you need :
Materials
Trim the printouts, such that one side is cut level with the edge and the other has about 10mm on the edge. The base can be left alone or trimmed as desired. The reason for the 10mm overlap is to reinforce the bend line.
 Reduced: 85% of original size [ 797 x 672 ] - Click to view full image
Stick down the printouts on your sheet of foamcard with the tops meeting in the centre. Make sure the overlap is under the next sheet along.
Reduced: 68% of original size [ 992 x 846 ] - Click to view full image
Reduced: 79% of original size [ 851 x 705 ] - Click to view full image
Cut out your pyramid blank.
Score the blockwork.
The procedure is to lightly cut through the outer layer of card and then run something like a ballpoint pen along the cut to indent the foam.
Cut and score the horizontal lines before cutting and scoring the vertical lines.
Reduced: 66% of original size [ 1024 x 768 ] - Click to view full image
Reduced: 66% of original size [ 1024 x 768 ] - Click to view full image
Reduced: 66% of original size [ 1024 x 768 ] - Click to view full image
Reduced: 66% of original size [ 1024 x 768 ] - Click to view full image
Mark the main fold lines on the underside.
Flip over and cut through the foamcard most of the way through on the main fold lines. You want to cut through the inner layer of card and the foam, but not through the outside layer of card.
Reduced: 66% of original size [ 1024 x 768 ] - Click to view full image
On each side of this cut and at each of the bare edges, mark a line 4mm away and cut through the inner layer of card.
Fold the main cut back on itself and cut a 4mm bevel on each side of the main fold line. This will allow the pyramid to fold up.
Reduced: 66% of original size [ 1024 x 768 ] - Click to view full image
Reduced: 66% of original size [ 1024 x 768 ] - Click to view full image
Similarly, cut a 4mm bevel along the bottom edge so that the pyramid will sit flat.
Reduced: 66% of original size [ 1024 x 768 ] - Click to view full image
Cut a square approximately 80mm on each side from scrap and bevel the edges as above. It is important to get this square as it will hold the whole pyramid square and reinforce it.
Reduced: 83% of original size [ 814 x 605 ] - Click to view full image
Trial assemble the pyramid, folding it up and making sure everything fits.
Take a length of masking tape and run it through your hands a few times to take some of the 'sticky' off.
Run a bead of glue down each fold line and use the masking tape to assemble the pyramid.
Reduced: 73% of original size [ 926 x 666 ] - Click to view full image
I have found putting the pyramid into a square food container point down works well for allowing it to dry
Reduced: 66% of original size [ 1024 x 768 ] - Click to view full image
Glue the edges of the bevelled square into the pyramid and put something heavy-ish in to hold it in position.
Reduced: 66% of original size [ 1024 x 677 ] - Click to view full image
Reduced: 92% of original size [ 734 x 657 ] - Click to view full image
Allow the glue to dry.
At this point you need to decide if you want to do any interior for your pyramid. A lot depends on what parts you have available. You could do a large-ish chamber or a simple tunnel and indicate a shaft to an underground tomb. Whatever you do, you need to plan it now and assemble any parts needed onto the base
Glue pyramid down onto the baseplate.
Allow the glue to dry.
If you want to cut the top off the pyramid, I suggest cutting along the third or fourth horizontal line of blockwork.
Note : The entrance could be at ground level or could be above ground level.
Reduced: 80% of original size [ 845 x 768 ] - Click to view full image
Painting :
Paint with texture paint. This has the effect of also smoothing out somewhat the scored lines for the blockwork.
Then paint or drybrush or whatever to suit your other terrain
Here are some completed pyramids in use...


It's a fun game with excellently sculpted miniatures, a very nice game engine and a fun background based on Egyptian mythology.
Anyway, building terrain is one of my favorite things and what is more egyptian than a pyramid!
HOW TO MAKE A PYRAMID
What you need :
Materials
- Foamcore
- A4 sticky lable paper
- Something solid to base the model, such as 3mm MDF or thin plywood or masonite. The minimum base size is 250mm square.
- Texture paint
- PVA glue
- Gold foil
- Masking tape
- Polystyrene foam and any parts you want to use for an interior.
- The Pyramid Side PDF file at My little PDF site
- Sharp knife
- A ball point pen or similar for scribing blockwork
- A ruler
- A small square food container.
Trim the printouts, such that one side is cut level with the edge and the other has about 10mm on the edge. The base can be left alone or trimmed as desired. The reason for the 10mm overlap is to reinforce the bend line.
Reduced: 85% of original size [ 797 x 672 ] - Click to view full imageStick down the printouts on your sheet of foamcard with the tops meeting in the centre. Make sure the overlap is under the next sheet along.
Reduced: 68% of original size [ 992 x 846 ] - Click to view full image Reduced: 79% of original size [ 851 x 705 ] - Click to view full imageCut out your pyramid blank.
Score the blockwork.
The procedure is to lightly cut through the outer layer of card and then run something like a ballpoint pen along the cut to indent the foam.
Cut and score the horizontal lines before cutting and scoring the vertical lines.
Reduced: 66% of original size [ 1024 x 768 ] - Click to view full image Reduced: 66% of original size [ 1024 x 768 ] - Click to view full image Reduced: 66% of original size [ 1024 x 768 ] - Click to view full image Reduced: 66% of original size [ 1024 x 768 ] - Click to view full imageMark the main fold lines on the underside.
Flip over and cut through the foamcard most of the way through on the main fold lines. You want to cut through the inner layer of card and the foam, but not through the outside layer of card.
Reduced: 66% of original size [ 1024 x 768 ] - Click to view full imageOn each side of this cut and at each of the bare edges, mark a line 4mm away and cut through the inner layer of card.
Fold the main cut back on itself and cut a 4mm bevel on each side of the main fold line. This will allow the pyramid to fold up.
Reduced: 66% of original size [ 1024 x 768 ] - Click to view full image Reduced: 66% of original size [ 1024 x 768 ] - Click to view full imageSimilarly, cut a 4mm bevel along the bottom edge so that the pyramid will sit flat.
Reduced: 66% of original size [ 1024 x 768 ] - Click to view full imageCut a square approximately 80mm on each side from scrap and bevel the edges as above. It is important to get this square as it will hold the whole pyramid square and reinforce it.
Reduced: 83% of original size [ 814 x 605 ] - Click to view full imageTrial assemble the pyramid, folding it up and making sure everything fits.
Take a length of masking tape and run it through your hands a few times to take some of the 'sticky' off.
Run a bead of glue down each fold line and use the masking tape to assemble the pyramid.
Reduced: 73% of original size [ 926 x 666 ] - Click to view full imageI have found putting the pyramid into a square food container point down works well for allowing it to dry
Reduced: 66% of original size [ 1024 x 768 ] - Click to view full imageGlue the edges of the bevelled square into the pyramid and put something heavy-ish in to hold it in position.
Reduced: 66% of original size [ 1024 x 677 ] - Click to view full image Reduced: 92% of original size [ 734 x 657 ] - Click to view full imageAllow the glue to dry.
At this point you need to decide if you want to do any interior for your pyramid. A lot depends on what parts you have available. You could do a large-ish chamber or a simple tunnel and indicate a shaft to an underground tomb. Whatever you do, you need to plan it now and assemble any parts needed onto the base
Glue pyramid down onto the baseplate.
Allow the glue to dry.
If you want to cut the top off the pyramid, I suggest cutting along the third or fourth horizontal line of blockwork.
Note : The entrance could be at ground level or could be above ground level.
Reduced: 80% of original size [ 845 x 768 ] - Click to view full imagePainting :
Paint with texture paint. This has the effect of also smoothing out somewhat the scored lines for the blockwork.
Then paint or drybrush or whatever to suit your other terrain
Here are some completed pyramids in use...

Subscribe to:
Comments (Atom)